2026-08-24 ·
How to Check an Older Buffalo Home for Hidden Mold
# How to Check an Older Buffalo Home for Hidden Mold
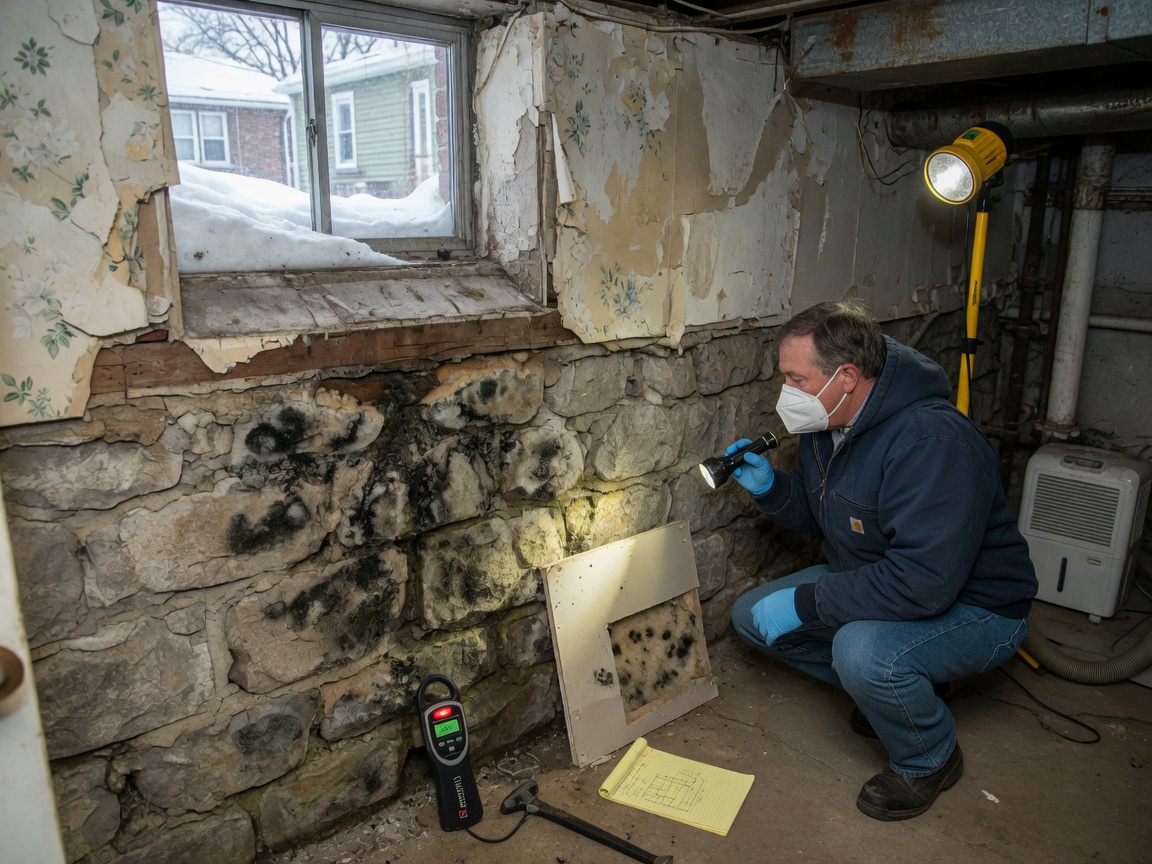
To check an older Buffalo home for hidden mold, start with its moisture history, then inspect the basement, attic, plumbing routes, exterior walls, and any area with stains or a musty odor. Use a flashlight, moisture meter, and humidity gauge, but do not open walls or pull up flooring when contamination may be present. Buffalo’s heavy lake-effect snow, spring thaw, and humid summers can keep building materials damp long after the original leak appears to have dried. The objective is not simply to find dark spots; it is to identify where water entered, how far it traveled, and which porous materials stayed wet.
Start With The Home’s Moisture History
Before inspecting surfaces, ask what has happened to the building. In Allentown, Elmwood Village, Black Rock, and other neighborhoods with older housing stock, previous roof leaks, foundation seepage, radiator leaks, and overflowing gutters may have left damage beneath later finishes. A freshly painted wall is not proof that the cavity behind it is dry.
Review or ask about:
- Basement water after snowmelt or heavy rain
- Ice dams and past roof repairs
- Plumbing leaks beneath bathrooms and kitchens
- Sewer backups or sump-pump failures
- Windows that collect condensation in winter
- Rooms that were recently paneled, carpeted, or drywalled
Pay attention to vague descriptions such as “the basement gets a little damp.” Record the date and location of each known event, then inspect below and beside it because water often travels along joists, pipes, and plaster keys. Buffalo homeowners dealing with seasonal seepage can also review how Buffalo snowmelt can lead to basement mold.
Inspect The Basement From Floor To Joists
Basements are the first stop because masonry can admit moisture while cooler surfaces encourage condensation. Begin at the floor and examine the wall-to-floor joint, corners, foundation cracks, utility penetrations, and the areas behind stored belongings. Then look upward at subflooring, rim joists, pipe penetrations, and joist bays beneath kitchens and bathrooms.
Use a bright flashlight held nearly parallel to the surface; low-angle light makes staining, fuzzy growth, and warped materials easier to see. Check cardboard boxes, carpet backing, wood paneling, and the bottom edge of drywall. White mineral deposits on masonry are not automatically mold, but they indicate that water has moved through the wall and justify a closer moisture check.
A musty odor that becomes stronger near a finished wall can point to damp materials behind it. Do not pry off paneling merely to investigate. A professional mold inspection can evaluate suspicious enclosed areas with less unnecessary demolition.
Trace Bathrooms, Kitchens, And Plumbing Chases
Hidden plumbing leaks often reveal themselves on the floor below rather than beside the fixture. Map the location of every tub, shower, toilet, sink, dishwasher, radiator valve, and supply line, then inspect the corresponding ceiling or joist bay underneath. In multi-story homes common across North Buffalo, University Heights, Lovejoy, and Kaisertown, a leak may follow a vertical pipe chase before appearing several feet from its source.
Watch for soft trim, swollen flooring, peeling paint, rusted fasteners, and recurring ceiling discoloration. Pressing lightly with a gloved finger can reveal softened material, but never push through a questionable wall or ceiling. Check inside sink cabinets around shutoff valves and where pipes enter the wall. Around tubs and showers, inspect failed caulk, loose tile, and darkened grout while remembering that surface staining does not show what is behind the assembly. Run fixtures briefly and observe accessible connections; stop if active leakage appears.
Check Attics, Roof Edges, And Exterior Walls
In Buffalo, roof problems are not limited to obvious drips. Snow accumulation and freeze-thaw cycles can contribute to ice dams, while warm indoor air leaking into a cold attic may condense on roof sheathing. From a safely accessible attic walkway, inspect roof decking, rafters, nail points, insulation, and the areas around chimneys, plumbing vents, and exhaust ducts. Dark sheathing needs moisture-source evaluation; color alone cannot identify the material as mold.
Confirm that bathroom and kitchen exhaust ducts terminate outdoors rather than in the attic. Look for compressed or displaced insulation, water tracks, and rusty roofing nails. On the occupied floors, inspect exterior-wall corners, window heads, and areas behind large furniture where air circulation is limited.
Homes near exposed waterfront areas such as Riverside and Black Rock may experience different wind-driven rain conditions than more sheltered blocks near Delaware Park. Regardless of location, keep the inspection visual and non-destructive. Roof access, unstable attic flooring, and damaged plaster ceilings should be left to qualified trades.
Use Moisture Readings Without Overinterpreting Them
A pinless moisture meter can help compare a suspicious area with a nearby dry reference of the same material. Take several readings rather than relying on 1 number, because metal corner bead, pipes, foil-backed insulation, and dense plaster can distort results. A pin meter leaves small holes but may provide a more direct comparison when used correctly. A humidity gauge is also useful; sustained indoor relative humidity above 60% increases the chance of condensation and microbial growth.
Meters locate moisture patterns, not mold species. Likewise, consumer test plates can collect ordinary airborne spores without showing whether growth is hidden in a wall or where the water source is located. When identification or documentation is genuinely needed, mold testing should follow a defined question and sampling plan. Testing is not a substitute for inspecting stains, odors, leaks, humidity, and damaged materials. Write down each reading, the surface tested, current weather, and whether heating or dehumidification was running.
Know When To Stop The Inspection
Stop and avoid disturbing the area if you find widespread growth, crumbling water-damaged material, contamination inside HVAC components, or evidence connected to sewage. The U.S. Environmental Protection Agency uses roughly 10 sq. ft. as a practical dividing point between many small cleanup situations and cases where professional guidance should be considered. Occupant health concerns can also change the appropriate response, particularly for people with asthma, severe allergies, or weakened immune systems; medical questions belong with a healthcare professional.
Do not sand, scrape, dry-brush, or aim a fan at suspected growth. Those actions can spread particles into cleaner rooms. Photograph the area, note odors and moisture readings, and address active water entry promptly. If removal requires opening assemblies or setting containment, review what proper mold remediation in Buffalo involves rather than treating staining alone. Pricing depends on access, affected materials, moisture sources, and containment needs, as explained in this guide to mold remediation costs in Buffalo.
Turn Your Findings Into A Repair Plan
Organize findings by urgency: active water, wet porous materials, suspected hidden growth, and old dry staining. Active roof, foundation, or plumbing leaks come first. Materials that remain damp should be evaluated quickly; painting over them or installing new flooring traps the underlying problem rather than resolving it.
For each location, record the room, dimensions, photographs, odor, moisture comparison, and likely water route. This gives a contractor or inspector useful evidence and reduces guesswork when the affected area sits behind plaster or basement finishes. In South Buffalo, Broadway-Fillmore, or near the Buffalo Niagara Medical Campus, the inspection sequence is the same: follow water from its entry point to the lowest or least ventilated material it could reach.
Mold Remediation Buffalo serves Buffalo and the wider Erie region during Mon–Fri, 8am–6pm, and Sat, 9am–2pm. Whether you inspect independently or request help, insist on a plan that corrects moisture, defines the affected materials, and leaves completed workmanship open to inspection.